Showing posts with label messenger bag. Show all posts

Sunday, November 16, 2008

Tutorial: Adjustable shoulder strap (aka recycling a felted bag)


There's an unused felted bag (from Lamb's pride worsted weight) that I never used. The opening was too wide and the strap too thin to work as a shoulder bag, so I thought it might work better as a messenger bag.

Materials needed:

2 D-rings (sized according to the strap and slider width)
slider (a rectangular ring with a middle bar)
nylon webbing (this was for a child, so it was around 42 inches)

The single strap was snipped off leaving about 2 inches which was sewn around a D ring. For a regular bag, use two 4-inch pieces of webbing (see here).


With one end of the strap, loop around the middle bar. Fold under the edge (to prevent fraying) and sew. With the sewn loop facing down, string the strap through a D-ring (starting from inside the bag to the outside) and and weave under and over the middle bar.


Loop through the other D-ring, fold under the edge and sew.


A messenger bag that can be converted to a shoulder bag. This will be my daughter's new library bag. Felted bags are great for books -- slightly waterproof and extremely durable with a bit of stretch.

Sunday, November 09, 2008

Echino non-messenger bag


I have this basket filled with personal projects that just need to be sewn. This was cut over a year ago for a tote bag, but my needs and taste have changed so the pattern pieces were converted into this non-messenger bag. I like the streamlined design of messenger bags, but thought the flap was awkward, especially for bigger bags. One hand has to hold it up while accessing the contents.


The flap closure was replaced with a zippered gusset with side openings for D-rings. The strap is adjustable (a little tutorial will be up soon for making one) so the non-messenger bag can be converted to a shoulder bag.


On the back side,there is a zippered pocket for keys and etc. It hurt to cut into this beautiful Echino fabric, but at least it was not the birdy :)

It's feels sleek and trim, yet wide enough for my enormous laptop. I love it!

Thursday, June 26, 2008

Friends and a messenger bag

My girls are attending a little summer school, just something to keep the neurons firing . Here is a summary of our conversation after the first day:

Mom: How was school?
Daughter: I like class time (a brief pause), but not recess. There's no one to play with. All the other girls already know each other.
Mom: Oh (*dies inside*). Maybe you can bring a book.
Daughter: But how will I carry it?
Mom: I can make you a bag.
Daughter: (brightens up) Can it have a long shoulder strap and hang around my waist?
Mom: A messenger bag...sure I can, sweetie (*thinks* "even though I've never made one before")

So my daughter's messenger bag leap frogs to priority number one, passing up stocking for
Renegade, completing custom orders, and DEFINITELY over washing dishes. It's finally done after midnight.
It's just wide enough for a binder (note -- daughter was dragged away from breakfast for the photo-op) with several pockets inside the flap and the interior. There's also an adjustable strap (so mommy can use it one in awhile). The bag was presented with a mommy pep talk: "every-time-you-see/use-this-bag-remember-that-mommy-loves-you-and-is-always-thinking-and-praying-for- you"
The little one wanted to pose as well. So here she is with her reversible headband (it's some floral Michael Miller fabric).Summer school update: she made a few friends :)

Friday, August 03, 2007

A black floral mini messenger bag

I've been wanting to make a little messenger bag -- just large enough for a small wallet, water bottle, and maybe a camera -- but the mechanics of figuring out an adjustable strap was daunting....until I found this at the local thrift store!Here is a little walk through the process...first cutting out all the fabric pieces (two outer side pockets, inner pocket, outer pieces, lining for all, and interfacing for most), mini D rings (and little webbing strips), and a zipper (oops, he didn't make the photo-op):Then sewing all the pocket pieces and top stitching and securing the D rings:

Adding the interior pocket to the liner (I always like one for pens): Then sewing the zipper between the two right sides (and no, a zipper foot is not always necessary):Then, with the zipper open, sew around (outer pieces and liner pieces facing each other) leaving an opening to turn it right side out (and add the D-rings too):
The finished bag (a fairly quick project):Other project notes: I also added a flat bottom so it could stand up better. It seems a little too vertical, but everything fits. *Love* having pockets on both sides and not having to deal with a flap when trying to find stuff. When I get tired of this bag, I can recycle the straps for another bag :)

Have a great weekend -- I'll see you all in a couple of weeks after family camp!

Tuesday, May 30, 2006

Call me Dr. Frankinstein


I've been crafting for others lately...I was asked to replicate a female version of a Zombie Kitten. It was quite a challenge to figure out a 3-D pattern for a softie (cut-stuff-adjust...cut-stuff-adjust) but I saw it as a paid internship, a fun way to try different technicues). Anyways, she turned out cute and cuddly...my girls agreed! She look a couple of spins in the Barbie convertible before she was rescued!

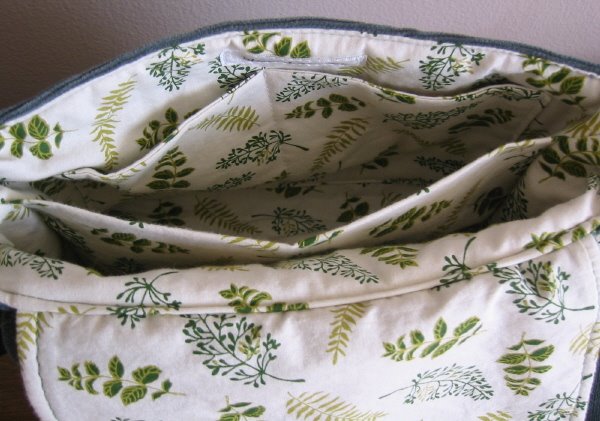
Another project is this messenger/fanny pack/shoulder bag. Using a channel in the back and a lengthly strap provided the versatility. The exterior is yet another hard wearing ulpholstery remnant. I love this leafy, ferny liner and the multiple pockets and divider.

Thursday, May 25, 2006

Striking out


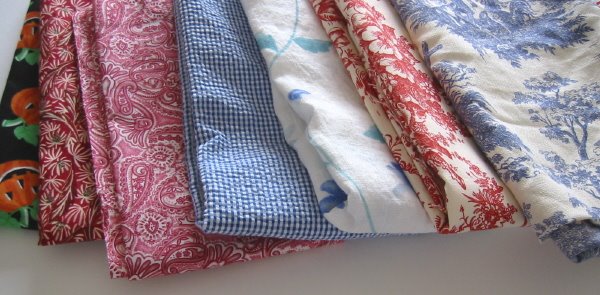
Unlike most bloggers (or so it seems to me), I have been striking out when rummaging through the linens at the thrift stores. Lots of acrylic afghans and Christmassy plaid sheeting, but no acceptable floral, retro or vintage prints. What's a girl to do? Visit a full price fabric store! Here are some of my finds. The first is a leafy print which would make a great liner for a messenger/shoulder bag design. The others are some fun prints that could possibly morph into totes, wallets, and purses.

The Halloween one would make great trick-or-treat bags (no matter how careful we are, we always end up with a sticky mess at the end of the night). The smaller prints could be wallets or business card holders. The red and blue toile, maybe another dowel handled bag to replace my current sewing/mending basket. I'm not sure about the blue gingham and the blue flowered linen yet. I am trying to have purposeful fabric shopping in order to justify my spending.